Country / Region:
Language:
Currency:

Dark Descent is a dungeon available once you reach to level 50 that can be undertaken up to three times a week. There is a scoring system that is applied to rank you against other players. You get points by slaughtering monsters, and you lose points by getting hit. Once you die or clear 30 rounds, you will be rewarded with Havi Berries which can be used at the Havi Berry vendor in Queenstown. The higher your current round, the less healing you can get from healing effects.
There is also supposed to be a weekly quest that can be garnered at the Stonehill Dig Site in Perion that drops several hundreds of Havi Fruit as a reward, but it seems to have been removed or not implemented into the game yet.
You will have reduced healing on these floors:
6-10: 10% Reduced Healing
11-15: 20% Reduced Healing
16-20: 50% Reduced Healing
21-25: 80% Reduced Healing
Not much to say about this round. There are some Vengeful Soldiers and Vengeful General. Kite them and kill them to move on.
This round shouldn’t be anything special either. The enemies are Frenzied Rottentail, Vile Rottentail, and Horrific Rottentail. The only thing noteworthy is that the Frenzied Rottentail will shoot projectiles at you, and they may be a little hard to see. Kite them and just be cautious about the projectiles.
The enemies are Writhing Zombies and Lantern Tomb Keepers. Just try to dodge the 3 projectile attacks that the Lantern Tomb Keepers shoot at you to minimize how many points you lose. You will also need to be careful about staying too close to the Wraiths since they have an attack where they create a field that stuns you momentarily.
This round is special because instead of killing all the enemies, you are supposed to survive for 30 seconds. The enemies on this round are Bustling Bunnies which charge up before dashing towards you. Try to kill as many as possible to get as many points as you can since they will endlessly respawn.
Your first boss round. The enemy is Mushfam who has a jump attack and a windup into projectiles which leave fields on the round. When the round starts, Mushfam will start off with a giant AOE pull attack that does an insane amount of damage. If your defense is not high enough, it will most likely one shot you instantly. You can avoid the very first instance of this attack by hiding in the very corner until you see the boss, or by being in the very center at the start. Afterward, Mushfam will repeat this attack occasionally, so watch out for that. The AOE pull attack has a cooldown of around 18-20 seconds, so try to predict it and run away from it before it goes off. Below is a video of me on my Priest which you may find useful.
This round has Polar Frost Lilfangs and Burning Flame Lilfangs. Try to stay away from the Flame Lilfangs until you clear the Frost Lilfangs. Kite the Frost Lilfangs by going from corner to corner, or staggering them to death. Once the Frost Lilfangs are dead, you can kill the Burning Flame Lilfangs with ranged attacks if you have any.
The enemies are Koborc Trainers and Mad Koborc Bombers. Similar to the previous round, the Mad Koborc Bombers are stationary and will throw bombs at you. One thing to note is that these bombs go a minimum set distance, meaning that if you stay in melee range of them they can not hit you so you may find that useful if you're a melee class and they're the only enemies left.
Like round 4, you will also have to survive for 30 seconds against Jawbreaker Bruisers and Jawbreaker Shotcallers. Unlike the bunnies, they will not dash towards you and run towards you like normal monsters. Use this opportunity to get as many points as you can!
This round consists of only Spooked Spooks. They will shoot projectiles at you and occasionally turn invisible. Even though they are invisible, you can hit them.
EVERYTHING BELOW IS FROM CBT2
Your second boss round. You will face against the Subterranean Slime King. He has a jump attack like Mushfam and another attack that creates water on nearby tiles. If you get hit by these water tiles, you will be stuck in a bubble (which contributes to a trophy by the way).
This is an interesting round where you can't just brute force it. There is a Gluttoad in a corner that you don't deal damage to. Instead of attacking the Gluttoad, you are supposed to kill the Nutritious Larva that is crawling towards the Gluttoad and avoid killing the Acid Spiders. When the Nutritious Larva or Acid Spider gets in range of the Gluttoad, he will eat them and heal if he ate the Nutritious Larva and take damage if he ate the Acid Spider. While all this is happening, rocks will be falling from the sky that deals a chunk of damage, so do your best to avoid them. The round is complete when Gluttoad dies from eating too many acid spiders.
An annoying round where you face up against Bubble Frillers. They will shoot a ton of bubbles at you that stun and deal damage. Not much else to say other than to dodge as best as you can and not rage when you're permanently stunned.
A very difficult and annoying round. You will be facing up against a bunch of Thieving Monkeys. They will throw bananas at you that deal damage to you and confuse you for 5 seconds if you get hit. While confused, all your direction keys are reversed so you will have to learn how to flip between normal and reversed keys. On top of that, the monkeys tend to run away from you. My strategy is to herd the monkeys into a corner and then AOE them down. This is a pain for Priests though, and you should expect to lose a lot of points on this round.
In this round, you will go up against a bunch of Reflective Crabbies. When they glow blue/purple, they will be vulnerable, but once they turn green/yellow, you will only deal 1 damage to them.
The third boss that you will face is a Rotted Snag. One of the attacks you have to watch out for is the breath attack that deals a lot of damage. He will also have an attack that shoots projectiles in 3 directions that stun you. When he swings his arm up before attacking and you hear a whirling sound, he's going to do a dash + swipe 4 times towards you. The most important thing is to dodge the stunning projectiles, as it will result in you getting hit by the other attacks right afterward.
This floor has two rings of poison on the floor, so make sure you don't stand on them. You will face up against a bunch of Lil Stealthy Boogies that will shoot projectiles at you and silence you (can't use abilities). The rings of poison on the floor will also turn you big, increasing your hitbox and making you both deal and take an extra 100% damage for 5 seconds.
This time you will face up against a bunch of Bursting Slimes. These slimes will explode and deal damage in an area around them after they die, so watch out.
You will go up against 5 Jawbreaker Protectors that reflect damage while they are swinging their nunchucks. You can try to weave in attacks in between their swings. There is no time limit and they do not chase you, so feel free to attack them and then heal up.
You will go up against Blooming Oniolings and Onitobis. They shoot projectiles at you, so watch out. The onitobis will shoot 3 projectiles at you, while the Oniolings will throw one single bomb at you.
You will face up against the Deus Ex Ox that mostly does a charge attack and a swing, with the occasional spinning attack.
You will go up against Dark Bronze Hogs that have a wind up before charging towards you. Nothing special.
You will face up against Corrupted Corpses, Risen Corpses, and Corrupted Zom-moms. The corpses will chase you, while the zom-moms will shoot projectiles towards you. Some of the corpses shoot projectiles at you too, so watch out.
You will face Masked King Avengers on this round. They will shoot homing projectiles at you, and shoot AOEs in a cone towards you.
This round contains Black Wolves and Silver Razorclaws, and you will have to survive for 30 seconds. They are nothing special, so use this opportunity to get as many points as possible.
You will face up against two bosses, Nyxie the Runaway and Epi the Lost.
Breaking news, my friend! Anyone who needs substantial MapleStory M Meso at a reasonable price, we have a treat for you now. MMOAH is providing a great service for buying MS 2 Mesos, along with big discounts as well. Follow the Buy MapleStory 2 Mesos to view more details or purchase now!
Every release, we choose some specific game balance issues and gameplay limitations to address and adjust. The patch notes tomorrow will provide the comprehensive list of changes but today we'd like to cover some specific changes and the reasons for them.
Stat Sticks
The use of "stat sticks" has been a feature of Path of Exile for a very long time.
A stat stick is an off-hand weapon that is not valid to use with a skill you are using when dual wielding. You get all the benefits of the stats on the weapon, while not having any limitations it might have affected the use of the skill. You can use a weapon that has the attack speed and/or damage you want for the skill, while the off-hand weapon provides excellent stats without its speed or base damage limiting you.
This use started off as an interesting gameplay element to use as part of a build, but over many releases, as more powerful modifiers on unique and rare weapons have been added, the power of stat sticks cannot be ignored when planning builds and is stifling other choices including genuine dual-wielding.
In 3.5.0 we are removing the ability to use stat sticks, through the following changes:
We found that with this change it was important to make skill binds specifically to your weapon set. You can now have an entirely different set of skills bound to your main set of weapons and your second set of weapons.
Energy Shield Recharge
Energy Shield Recharge is no longer interrupted by non-damage changes to your Life or Energy Shield.
(For context, we announced last week that Eldritch Battery now causes you to have 50% less Energy Shield Recharge Rate.)
Initially, this change was explored as a way to make it easier for casters to use Eldritch Battery to solve many issues. One major issue standing in the way Eldritch Battery being effective is that it doesn't work very well on its own, needing something like Zealot's Oath to go along with it.
While there were concerns that this might introduce issues with other builds when tested it was a justified change and was beneficial for a variety of cases.
As a further support for Eldritch Battery and Energy-Shield-based builds in general, more flat Energy shield has been added on the tree.
Cap on slowing effects:
The total amount that you can slow the expiration of an effect on a character through a time-slowing mechanism (such as Temporal Chains) is now capped at 75% from all sources.
Time-slowing effects are very powerful defensive tools. Limiting time-slowing to a cap allows us more flexibility in making content, as well allowing us to provide more options for giving players time-slowing effects.
Unique rebalance
The patch-notes tomorrow will cover a large number of unique item rebalances. Some of these are simple numerical changes, while others are closer to redesigns.
The following principles were applied in looking at rebalancing unique items:
While many unique items were adjusted, this is an ongoing process, and some items that may have deserved a change by the above principles might not yet be addressed.
Cast on …
When looking at unique item balance, some items that offered triggered effects had their cooldowns reduced. It was difficult to do this without also looking at other triggered effects. As a result, the Cast on Critical Strike Support and Cast on Melee Kill Support will also have their cooldowns reduced.
Archetypes
One of the approaches we use in patches in developing skills and making changes around some specific play styles. This is centred around the concept of having some build archetypes. We make a specific build, and add features and balance changes around that build. While some players are expected to end up in the archetype, we also want the tools to be useful in existing builds, and to allow and change other builds that share elements with it.
The three archetypes for 3.5.0 were a cold-based DOT spell caster, a Hierophant-based caster based on a new skill type (Brands), and the Champion based melee character based on new Axe and Sword "Steel" skills with a new effect Impale, supported by a new skill type, Banners.
The cold-based caster has led to the new skill Winter Orb, rework of Arctic Breath and Ice Spear and adjustments to Ice Nova and Vortex. This caster archetype has led to a number of changes on items, the passive tree, and the Occultist tree in particular. Added Cold Damage Over Time Multiplier and non-ailment Chaos Damage Over Time Multiplier is on new item modifiers, on the passive tree and on the Occultist. The values on various cold and chaos nodes were modified.
As well as the new Brand skills, the archetype based on them has led to changes on the Hierophant, and also had a knock-on effect for totems. A number of totem nodes now also offer benefits for Brands. The Hierophant node Ritual of Awakening no longer grants +1 to the maximum number of Summoned Totems. Instead, it now causes skills that would Summon a Totem to summon two Totems instead, and grants 3% more Damage per Totem.
Additional totems are now available from other sources, and players will have a number of options for totem-build, as well as being able to explore the new Brand skills.
The Champion now has a strong Impale based way to play and has had changes to support it. Tectonic Slam has been adjusted for it, while Shattering Steel, Lancing Steel, War Banner and Dread Banner have been added as new skills.
But what about Self-Casting?
In the last few days, the community has been very keen for news for casters who don't rely on totems or triggers, which is often referred to as self-casting.
Self-casting has not been a specific focus of the set of balance changes for 3.5.0, and we don't want to try rush in further big changes without extensive testing.
Betrayal does include some changes for various things associated with self-casting. We have designed the new cold skills to be aimed at self-casters, for example.
We are sure you'll find interesting builds and choices of many kinds in Betrayal. There are already some balance changes planned and underway for 3.6.0. We expect to keep a good eye on gameplay during Betrayal to see how our plans need adjustment, and to develop a picture of the balance roadmap for next year.
Want some items in Fortnite with the cheapest prices and fastest delivery, top-secured purchase experience as well? Click POE Currency or POE Items for more information and further consultation!
Your wallet can be exploited by moving to the top left and clicking on the Wallet button.
Treva is a currency that can be garnered by entering into PvP maps (the maps on the top-left of the map) and killing elite bosses. These elite monsters can be located by searching your minimap and should be pinpointed by a small red dot. If you don't see any, you can start slaughtering random monsters or shift channels. You can quickly switch channels with the /next-channel, /backchannel, or /move channel number_here commands (type /? to see the commands). Killing these elite monsters give you a chance at creating a portal to the Twisted Pocket Realm. These portals last for a few seconds, and once you go through, you will be teleported to one of the different Twisted Pocket Realm "minigames" (butchering a boss, butchering rainbow slimes, butchering chests, butchering mobs from an ambush, sabotaging towers). In the butchering of rainbow slimes and chests, you will be rewarded with Treva for each one you kill, and completing the other game modes will make for 4 chests to spawn at the end that spits up Treva and Mesos when opened. There is a probability that these chests turns out to be golden when they are opened, which will grant you more Treva than normal. You can consume Treva by visiting Queenstown and locating the shadow merchants at the top right. One of the vendors offers a glove that gives you 5.4% physical/magic piercing, which is a great placeholder until you get something better. You can also spend your Treva on Gem Dust boxes or Tier 1 gemstone boxes.
Personally, farming Treva with another player would be much more efficient than solo action. Although you have no choice but splitting your rewards in a co-operation, it is much faster since the elite monsters will sometimes have shields that switch between physical resistant to magic resistant.
Rue is garnered through the “Hoard Things” daily missions (each mission gives 4 Rues) or by completing the World Boss Daily Missions offered by the NPC (Aliyar) in Queenstown (each World Boss Daily Mission gives 1 Rue and 5 Blue/Red stars). Rue can be consumed by visiting the vendor in Queenstown. The most outstanding items that you can purchase from this vendor is the 60-Metacell Jar for 4 Rue, and the incredibly powerful Spicy Maple Noodles for 40 Rue, which is a consumable that implant an item on the floor that multiple players in your party can pick up, granting them 6% extra damage for 15 minutes. This is pretty helpful for Chaos Raids.
Havi Fruit is obtained through Dark Descent and can be consumed by visiting the Havi Fruit vendor in Queenstown. Probably the best thing from the vendor is the Swallowed Darkness gloves for 800 Havi Fruit, which gives some pretty great stats. It lasts for only 3 days though and cannot be enchanted. Supposedly there is a weekly quest that you can accept at the Stonehill Dig Site that rewards you with extra Havi Fruit, but it seems to have been removed or not implemented yet.
You can consume these red stars at red star vendors (such as in Queenstown). You can harvest Red Stars from completing the daily World Boss Missions in Queenstown (gives 5 red/blue stars) or by questing the hard dungeons. This vendor has many good tonics and lapentiers, including the extremely powerful Rooted Strength Lapentier. The vendor also sells Metacells.
You can consume these blue stars at blue star vendors (such as in Queenstown). You can garner Blue Stars from completing the daily World Boss Missions in Queenstown (gives 5 red/blue stars) or by unlocking the chests you obtain when you complete 1/3/5/10/15/20/25/30 dungeons per week. You can also harvest them from doing the “Hoard Everything” daily. The most notable rewards from the vendors are the tonics, the Metacells, the Life Drain Lapentier, and the Shockwave Lapentier.

In-game Currency transaction is a common concern and issue in most MMORPGs. No matter the game is a newly-released or a long-lasting old one, in-game currency transaction exists and develops, especially in some large MMOs including Digimon Masters Online(DMO for short). Plenty of players from the game want to purchase Digimon Masters Online Currency. That is a basic requirement, but somehow DMO Players are confused how to buy DMO Tera, as well as not being scammed among a pile of DMO currency dealers. How to buy cheap Digimon Masters Online Tera and not be ripped off at the same time? Well, today MMOAH will discuss and address this issue together with all DMO gamers.
-Choose a reliable and widely-praised DMO Gold trade website
Choosing a reliable website with a good reputation can avoid lots of unnecessary troubles. Let me introduce a professional and reliable DMO Gold site, MMOAH. It has over 8 years' experience in the gaming industry and can provide the high-quality virtual currency with the premium customer services. Its products and services have been served to customers and players from North America, Europe, South-East Asia, and the Middle East region. The strength of this website is that it can supply a variety of in-game currency which is usually much cheaper, safer and faster-delivered than others. MMOAH.com has tons of reviews from real players that demonstrate their ultra-trust and infinite support on it. And currently, the website is scored at 9.6/10 in Trustpilot, outdistancing most of its peers.

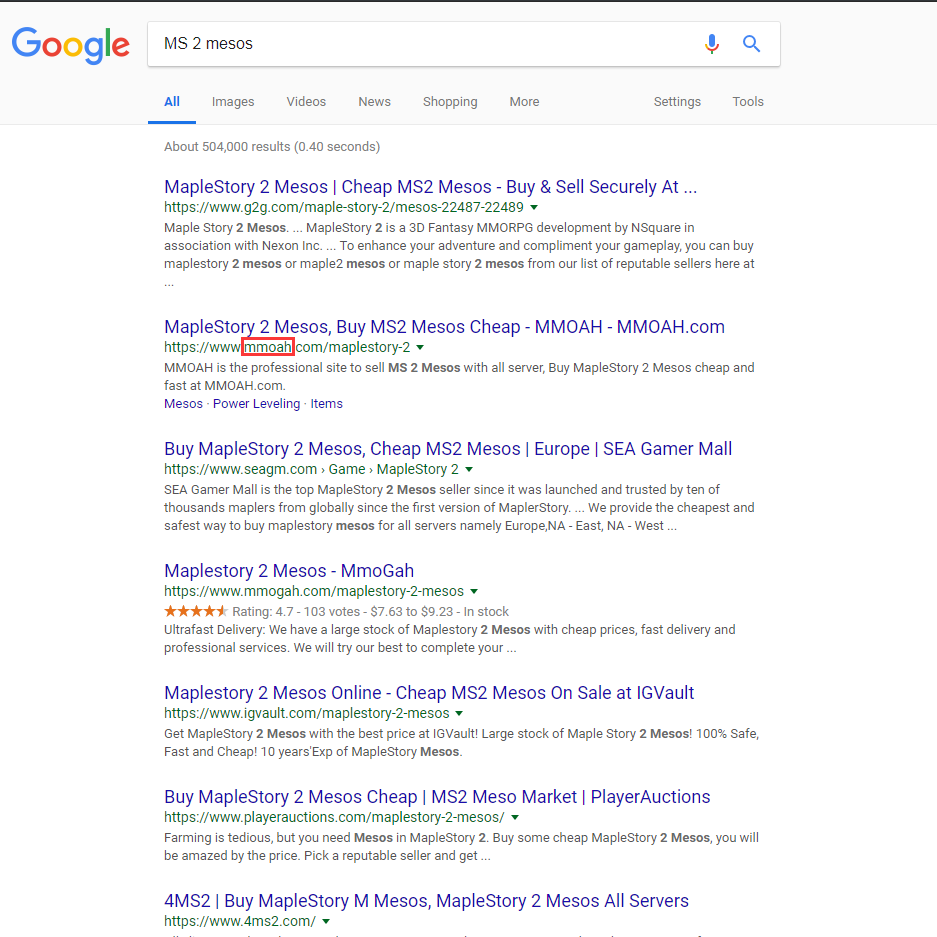
MMOAH is absolutely one of the best DMO Tera dealers, ranking No. 1 by searching "DMO gold" in Google and that many more popular games' keywords in MMOAH rank top 3 by searching them in Google. For example OSRS Mobile gold ranks No. 2, NFL Overdrive coin ranks No. 1, MapleStory 2 Mesos ranks No. 2, FH4 Credits for sale ranks No. 3, MUT 19 coins ranks No. 3, POE goods ranks No. 3, and so on.
As we all know, Google has its rigorous detecting and punishment system which can easily recognize and locate the spam websites and shut them down immediately. So There is no doubt that a website like MMOAH with such high ranks in Google Search, is 100% safe and reliable. As you see here, MMOAH is chosen to be the trustworthy DMO TERA seller by many players and customers, and it is the first option for more DMO Gold buyers.
Many of our new and old customers do not know the details and procedure to buy DMO Tera at MMOAH. Now follow our step by step to learn about how to buy the cheapest DMO TERA easily!
1. Register in MMOAH
We found that many customers have been placing orders as tourists without signing up or singing in on our websites. Therefore they lost the great opportunity to savor the member discount. Sign up on our website to be a member is important, which is convenient when you place your orders:
Faster Checkout
As our member, your personal info is kept secure by us, and you do not have to fill in the same contact info every time when you place an order, which can ensure fast verification for your order.
Get Your Member Discount
After you have registered on our site to become a VIP, logging back in with your own account every time when you place an order could be very useful and benefited. After placing your order, it'll automatically count the money you have spent to give you the corresponding membership/VIP discount.
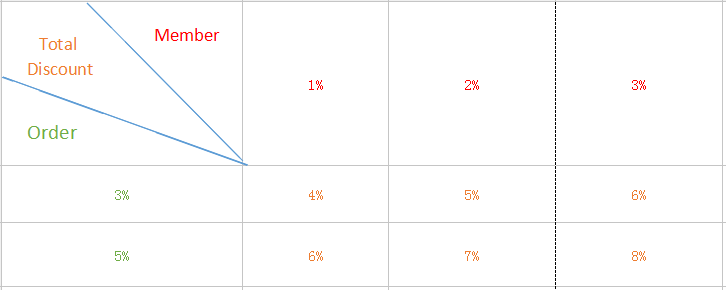
Below is the chart to show you how the VIP discount works:

2. The larger numbers of orders you place, the larger discount you will get.
Y'all DMOers can get the discount if order DMO Tera at MMOAH. We have different discounts according to the different numbers of orders for DMO Gold, more DMO currency you buy, more discount you will get.
Here is a chart to show the total discount clearly. Moreover, you can use Coupon Code in one order.
3. Coupon Code for Large Discount
You can use coupon code at any time and choose the way that you like. Please follow our Facebook Page: www.facebook.mmoah.com to get a large discount.

4. Festivals Coupon
In order to thank you for our new and old customers continuous support, we provide different big discount codes on all important festivals, usually with a short-lasting valid duration. You can get the festivals coupon directly from our News section or social media page, even email letters. So pay attention to any official announcement from MMOAH when it comes to holidays or festivals.
For example:
You want to place an order for 1000 DMO TERA.
- At first, sign up on MMOAH to be a member(if you do not have an account on our website);


- Choose "Omegamon" and click "1000T" option, then click "buy now", there goes to the checkout page(make sure your account is really in Omegamon, not others);
- Verify your products in your shopping cart carefully(including price, quantity), then fill out the discount code section with the code you already get, after that, we move to delivery information and payment method part;

- In the Delivery Information section, all terms with red stars on it mean that the below blanks are required fields. Please fill out the required fields correctly without missing anything. Please view the notice at the bottom of this section and get yourself ready once you finish the payment and prep up for trade in the game.

- The next is payment method part, the above screenshot listed all the payment methods we support currently. Be noted that any other payment methods which are not included in the above screenshot are not applicable for MMOAH payment system for now. Please choose the payment method for your own convenience and preference;
- After that, please review your order again. Once it's okay for you, you can click the "place order now" button to proceed and finish your payment. Once your payment is received by our system. Your order is finally created and will be processed immediately;

- After your payment is finished, please go back to the MMOAH website page, click the "click here to chat" button in the right bottom of the website page, you will start a conversation with our customer service within 1 minute. After our customer service check upon all your order information, you will be informed to log back in DMO and go to the certain place for receiving your ordered product. Please be noted that the transaction belongs to the type of Face To Face. We are only doing this when your game is online, as well as you are capable of finding our delivery guy under the character name and Transaction location(Including Dats Center, channel, and other specific details) our customer service sends to you previously. After you receive the product from our delivery guy, please make sure anything correct and fully-delivered. If you have any problems with this delivery and the result, please get right back to our customer service ASAP to address that. If there are no complaints about this delivery from you in 30 minutes after it's finished, we will generally regard it as a "completed transaction".
UGC is the abbreviation of User Generated Content. Basically, it's anything out of the game (mostly pictures, words, video shots, dubbings) that a player can upload into the game for other players to share with.
If you already have an accomplished template, you can opt for the template from images below the new button. These images shown will be jpg images in your custom folder (For example D:NexonLibrarymaplestory2appdataCustomEquip). You can open your folder including all the images by clicking on the open folder button:
You can also relocate jpg images to this folder and they will show up in the Maple Workshop after you close and start over.
You can also create a new template. If you do, it should create a new file and open up a default image editor (Paint for example). You can from there copy the image and paste it onto a better image editing software, such as Paint.NET, Paint Tool SAI, or Photoshop. I personally use Paint.NET. You can, of course, use regular Paint, but it will be extremely difficult because there is no layer functionality in such a basic image editor.
Make sure that if you are copying and pasting the template onto another image editing software that you save it into the folder that contains the images.
Once you have saved it into your folder or replaced the original template, any changes that you make to this image will immediately show up in the preview in the Maple Workshop.
This automatic update of the preview is extremely helpful because you will make many changes to the template and will want to see if your edits line up since two opposite sides of the template will wrap around.
For general tips on the actual designing of the UGC, I don’t really have much to offer personally, since I am not an artist, nor do I have a tablet. It’s probably a good idea to use reference pictures of actual clothing online, or if you’re basing your character off of some anime character (like me) or character from a movie, you can design your clothes off of them as well.
I use Paint.NET and utilize a ton of layers when making a new piece of clothing, as well as several plugins for Paint.NET, including the Smudge tool, Drop Shadow, Feather, Inner Shadow, and Object Shadow.
You need a minimum of 2100 Gear Score to enter this dungeon. The ideal composition for this dungeon is 1 Priest, 2 DPS, and 1 Knight. Most likely you will need 1 or 2 epic gear at level 50 to have enough GS to enter the dungeon.
The main platform is surrounded by a pit of lava which does a ton of damage to you, so try not to go into the lava unless necessary. Something to keep in mind is that for some reason, Balrog can crit, which can lead to some unlucky deaths out of nowhere.
In this phase, Balrog only has two attacks. As long as you get used to these attacks, you should be able to go through phase 1 pretty smoothly. However, if you’re doing Balrog for the first time, you will most definitely die a lot, especially do his triple swing attack, especially if your defense is too low, as you may die to just two swings.
This is one of Balrog’s most deadly attacks, and he will use this throughout the entire fight, so you better get used to it if you want to clear this dungeon. The attack starts with him facing towards someone, then quickly bringing up his weapon before doing his first swing to his left. You barely have any time to notice the animation before he does his first swing, so you should expect to get hit by his first swing if you are facing him. After his first swing, he does a swing to his right. Finally, he will bring his weapon above him and smash the area right in front of him. No matter what, you MUST dodge this third swing/smash, as it will most likely result in a 1 hit kill. The hitbox is also a bit bigger than you think, so play safe and dodge away or into him depending on your position.
You can dodge this final swing if you are close enough to him. If you have enough defense, you can actually tank the first two swings and hug him in melee range, and rely on your healer or your potions to keep you healthy enough for the last attack, since you won’t have to worry about the third swing/smash since you are in melee range and won’t get hit by it. If you don’t have enough defense though and think you will die from the second swing, you must dodge the second swing as soon as he does his first swing. Probably the safest way is to dodge through him. Dodging to the sides may sometimes lead you to instantly getting hit by the second swing, and dodging away from him will leave you vulnerable to the final swing/smash.
Also, the third swing/smash will leave an AOE on the ground that will leave you with a damage over time debuff if you touch it, so try not to run into it.
Balrog will bring up both his arms and rear back before roaring in a direction with a hitbox in the shape of a cone. This shout will slightly damage you and knock you away from him while also leaving you with a debuff that slows you and reduces your attack by 50%. This is then followed up with him glowing red and hunching over before he charges forward quickly in that direction, dealing damage and knocking you back. The breath's knockback damage can be ignored, but you have to be careful that you won’t be knocked into the AOE that is left on the ground from his smashes or into the lava. Luckily, the dash can be easily dodged by dashing to the side. Even though the shout doesn’t do a lot of damage, you want to dodge it because the debuff that reduces your attack by 50% is really significant.
At 85% health, Balrog will jump to the center and scream roar outwards, making rocks fall from the ceiling randomly. There will be indicators for the rocks before they fall, so try to dodge them as they do hurt a lot. After the rocks have fallen, he will raise his weapon for around 5 seconds before doing a huge swing that will hit anyone on the platform and kill anyone hit by the swing. To dodge this swing, you must either stack on top of a Knight and hide under their bubble shield, or jump on top of the pillars that spawn. You must be on the very top platform on the pillars to avoid the attack, and ranged characters can DPS from the top platform while they’re waiting for the swing to pass. You can also stay on the middle platform if it is too difficult to reach the very top platform, and then jump as Balrog swings, avoiding the attack.
Balrog will occasionally stop and shout “Burn them alive” or “Aid me”, resulting in three dragons to spawn in the elevated platforms on the top left and top right. After summoning them, Balrog will walk toward the center of the platform before focusing on the closest target and doing a breath/shout attack. It is the job of someone (usually the knight) to go in melee range of Balrog to get the aggro while doing damage and pull Balrog away from the rest of the group who will work on the dragons, but anyone can do this same job. These dragons will start throwing fireballs that cannot be dodged and apply a stack. Each of these stacks reduces your defense, so it is vital that you kill them as soon as possible before they start doing too much damage. The players who have to kill the dragons will have to stand on top of the red elevated blocks will deal a decent amount of damage over time (but not as much as lava), and you will have to sit on them while you DPS down the dragons.
While the DPS goes to kill the dragons, the Priest should be healing the DPS and assisting. Before going to help the DPS though, Priests can throw down their cross-shaped heal ability in the center for the tank/person who is taking aggro.
During the second phase, Balrog will dash two times consecutively instead of a single dash like the first phase. The second dash will target the closest person after the first dash has ended.
At around 65% health will phase and start off with a new attack…
Balrog will jump to the center and glow red before doing an attack that pulses, with the pulses dealing damage and stunning you. When he does this attack, everyone should immediately group to the center where there are two ways to survive this attack. First, is that everyone’s health must be topped off at 100% by the Priest and spamming their heal until you get stunned, and your tank through the pulses. Tanking all the pulses from 100% will leave everyone at around 20% health if the Priest manages to heal the first pulse (since only the second pulse stuns). The Priest can also throw down their cross-shaped heal before everyone gets stunned in the center, but it’s not necessary since there’s time to heal everyone once the stun goes away before the next attack. The other way is to use the Knight bubble shield to block the pulses and DPS Balrog while the attack is going on.
In phase 3 and from thereon, Balrog does three dashes instead of two after his roar. After the third dash, he will be stunned for a few seconds. Once again, he will target the closest person after the previous dash.
At around 45% health he will go into another dragon spawning phase and start off with the same attack at the start of phase 2 where he creates the pillars.
At around 30% health he will transition into his final and toughest phase. In this phase, I believe that he only dashes once after his roar knockback. This phase is the hardest because of a new attack...
This is the attack that you will have to master dodging if you want any chance of clearing the dungeon. He will jump to the center and start glowing a violet pinkish color. He will throw down three rocks at each person that you need to dodge. After the third rock has fallen, he will deal AOE damage that will most likely one shot you. If you somehow survive the hit, the AOE will stun as well. There are two methods of surviving the attack. First is to dodge the first rock and then gather around the Knight immediately (if you have one) who will then use his bubble shield which will block the 2nd and 3rd rock, as well as the AOE. The second method is to go into the lava to the South and start jumping as you go into the lava (you spam jump to reduce the damage you take from the lava). You can use a potion and go back onto the platform right after the AOE has passed, but this requires precise timing, so instead, it’s a better idea to keep jumping to the South and land on the small platform from where the bridge entrance was at the start of the dungeon. Make sure that when you reach this small platform that you do not touch the teleport portal until the AOE has passed. After you get onto the platform, you simply wait until the AOE has passed before you take the portal to go back onto the platform. The Priest can heal while you guys wait, or heal when everyone takes the portal.
Make sure your Knight lets you guys know when his bubble shield is on cooldown since that is when you guys will have to use the second method.
At around 25-30%, an NPC named Tristan will spawn to aid you. He has an ability that stuns Balrog, and you can look out for this by the animation where Tristan will raise his sword upwards and it will shine a few times. This is extremely helpful because it can interrupt Balrog when he does the combined attack and you won’t have to go to the lava or hug your Knight if you manage to keep an eye out for when Balrog will get stunned. One thing to note is that Tristan will have a 100% chance of stunning Balrog on the first AOE that he does after Tristan spawns.
As a Knight, it may also be helpful for you to tell your team beforehand that you will always bubble at a specific place, for example, "I will bubble in the center" or "I will bubble on Tristan" so that your teammates will know where to go.
Knight Block
Lava Escape Route
Tristan Stun
And that’s basically it! Just survive his falling rocks, his triple swing, his dashes, and the stunning AOE and you should be able to kill him.
If you are not satisfied enough with the trophies and rewards you achieved from slaughtering the ultimate boss Balrog in the Temple of Immortals raid or any other raids, there is a special place for you to pay a visit and benefit from - MMOAH. It has been dedicated to the MS 2 Mesos' transactions for months since it had been released. And Prove himself as one of the cheapest product on the market when it comes to MapleStory 2 Mesos. Not only the product itself seduced thousands of players placing their orders on the website, but the service, especially the delivery of its products intrigued more and won against other companies.
Below, I will be using this page to show you how to get the trophies that are not so straightforward to get. I will most likely not update this page any longer, since Doom seems to be doing a great job with creating a trophy guide above.
These trophies are obtained by collecting books. These books can be sold on the black market.
Trend-setter - Collect all of the latest popular magazines
BEAUTY / Drs.Zenko & Dixon, PhD - Collect the book "BEAUTY / Drs.Zenko & Dixon, PhD"Collect in Tria Library
A Griffin's Adventure - Collect the book "A Griffin's Adventure"Collect in Tria Library
Hephaestus Travel Guide Vol. 69 - Collect the book "Hephaestus Travel Guide Vol. 69"Collect in Besherel Magic Library
Ellinia's Monster - Collect the book "Ellinia's Monster"Collect in Besherel Magic Library
Punky Pig's Big Day - Collect the book "Punky Pig's Big Day"Collect in Besherel Magic Library
The Vanishing Girl - Collect the book "The Vanishing Girl"Collect in Flora Avenue by killing Madonette.
Nelph's Story - Obtain the 4 storybooks related to NelphCollect from the bosses in the Poison Cave dungeon.
Alikar Prison Brochure - Collect the book "Alikar Prison Brochure"Collect in Alikar by going there and talking to Guardsman Zekk
Urza's Diary - Collect the book "Urza's Diary"Collect in Crooked Canyon by killing Urza or opening the brown chest in the cave. Rare drop chance.
Observer's Account - Collect the book "Observer's Account"Collect in Kerning Interchange by killing Masked Swordsman. Rare drop chance.
A Brave Pig - Complete the quest "The Pig Takes Flight"Complete the quest in Trinian Crossing. The pig is in the very south of the map.
Cats in Love - Cats on a Crane (Barrota Port, Janine, Lv. 15)
Don't Lose It Again! - Arwen's Glass Slippers (Ellin Grove, Arwen, Lv. 26)
Suffering for Your Art - Artist vs. Artiste (Barrota Shore, Meminem, Lv. 13)
The Accursed Axe - A Rotten Malcontent (Henesys, Militia Captain Oska, Lv. 22)
Free Crabby - Crabby Sabotage (Beachway 111, Moma, Lv. 14)
Care for a Corn Dog? - Crabby Capture (Beachway 111, Fisherman Stan, Lv. 14)
Butterfly Conversationist - Flight of the Butterflies (Trinket Woods, Yord, Lv. 28)
Witch Hunt - Witch's Wager (Serene Docks, Monshel, Lv. 38)
Full Moon's Curse - The Howling Stone (Perion, Lamionne, Lv. 32)
Grim Vision - Mournvul Vision (Perion, Kaveki, Lv. 30)
Desert Groove - Secret of the Dance (Pigming Clan Altar, Tanz, Lv. 41)
The Terrible Tohs - The Returned Villager (Perion, Wolf Girl Tina, Lv. 43)
Your Tears are Delicious - Ipigio the Inedlicate (Torhara Spring, Ipigio, Lv. 27)
The Truth is Out There - I Want to Believe (Andrea Barony, Timmy, Lv. 25)
Frognapped - Operation Frog Rescue (Ellua Riverside, Papa Frog, Lv. 37)
Wakey-Wakey Boroboro! - The Lost Stones (Great Ellin Tree, Shapian, Lv. 37)
The Fountain of Melody - Broken Melody (Picchu Picchu Gardens, Ringling, Lv. 32)
Hands-on Herding - Baa Baa Pink Sheep (Evansville, Beans, Lv. 14)
Jealousy of the Fairfolk - Borrower's Remorse (Tria -> Tria Library, Head Library Anne, Lv. 13)
Star-crossed Love - Utterly Charmed (Tria, Maya, Lv. 32)
Forest of Friendship - Happy Little Trees (Fairy Tree Lake, Hurum, Lv. 12)
Zero-Sum Love - Love Hurts (Mounthill, Morris, Lv. 22)
Pig-Approved Diet - Diet Hard (Sweetskirts, Hamantha, Lv. 33)
Gainful Employment - Below His Station (Kerning City -> Kerning City Hall, Mayor Marco, Lv. 15)
Pizza Delivery! - A Timely Interview (Kerning City -> Goldus Tower Lobby, Goldus's Secretary, Lv. 20)
Doon-done - Life Finds a Way (Kerning Junkyard, Manager Poron, Lv. 15)
Counter Clock-wise - Tick Tock Clock Tower (Clock Tower Square, Researcher Marlowe, Lv. 40)
Blake, My Love - Clandestine Photo Shoot (Majore Lake Park, May, Lv. 20)
Larger than Life - Making it Big (Fellowstone Construction, Vito, Lv. 21)
Halt! - Like Rats in a Trap (Aquatopia, Guardsman Jimmy, Lv. 50)
Plunderer of Luxury - Mr. Arthur's Day Out (Ludari Mall, Mr. Arthur, Lv. 50)
Professional Smeller - It's a Secret (Moonlight Desert, Scout Captain Gree, Lv. 50)
Karkar Meerkat Patrol - It's a Secret (Moonlight Desert, Scout Captain Gree, Lv. 50)
Night Sky in Bloom - Walk with Light (Sandstar Ruins, Miel, Lv. 50)
Photographer for the Day - The Best Business Plan (Rainbow Valley, Chairman Modir, Lv. 50)
Be Still, My Heart - Get Rich Quick (West Auto Bridge, Gulliver Olivieta, Lv. 50)
Snakebite Medicine - Scary Cute (Lavendar Island, Melatina, Lv. 50)
Island of Lavender - Scary Cute (Lavendar Island, Melatina, Lv. 50)
Rail Worker - Imposters (Ludari Station, Monorail Conductor Roshimov, Lv. 50)
There are some maps though where it is very efficient for farming the trophies if you want to go beyond just attacking with it once, and I will add on to the list as I find them.
Fire BAD! - Attack with a torch 1/100/1,000/5,000/10,000 times (Frostember Void)
Let's Roll - Attack with a tire 1/100/1,000/5,000/10,000 times (Golden Tower Elevator)
A Toxic Environment - Attack with a poison bag 1/100/1,000/5,000/10,000 times (West Wind Hill)
Barrel Blast - Attack with an Oak Barrel 1/100/1,000/5,000/10,000 times (Cheliska Bay)
Drop the Bomb - Attack with a bomb 1/100/1,000/5,000/10,000 times (Ant Tunnel Plaza)
Cranky Camper - Attack with a tent 1/100/1,000/5,000/10,000 times (Sandstar Ruins)
Kerning Bus Beatdown - Attack with a Kerning bus 1/100/1,000/5,000/10,000 times (Muros Media Park)
Breaking news, my friend! Anyone who needs substantial MapleStory M Meso at a reasonable price, we have a treat for you now. MMOAH is providing a great service for buying MS 2 Mesos, along with big discounts as well. Follow the Buy MapleStory 2 Mesos to view more details or purchase now!

Runescape is one of the most long-lasting and influential MMORPGs in the world. The game initially released in England, 2001, soon becoming a big hit across the whole British territory and other European countries. Until 2007, a severe divergence between two different attitudes and opinions over Runescape's future upgrade and genre induced the two different versions of Runescape: Runescape 2007 and Old School Runescape(OSRS for short). Now, under the lengthy appeal and requirements for a portable version of Runescape, OSRS Mobile port was finally launched by Jagex in App Store and Google Play on October 30, 2018. For veteran gamers of Runescape over decades, you might fond of the mobile portable Runescape packed with drastic nostalgia.
In-game Currency transaction is a common concern and issue in most MMORPGs. No matter the game is a newly-released or a long-lasting old one, in-game currency transaction exists and develops, especially in some large MMOs including Runescape. Plenty of players from the game want to purchase Runescape Gold. That is a basic requirement, but somehow RS Players are confused how to buy Cheap RS gold, as well as not being scammed among a pile of OSRS Gold dealers. How to buy cheap RS Mobile Gold and not be ripped off at the same time? Well, today MMOAH will discuss and address this issue together with all RS gamers.
-Choose a reliable and widely-praised OSRS Mobile Gold trade website
Choosing a reliable website with a good reputation can avoid lots of unnecessary troubles. Let me introduce a professional and reliable RS Gold site, MMOAH. It has over 8 years' experience in the gaming industry and can provide the high-quality virtual currency with the premium customer services. Its products and services have been served to customers and players from North America, Europe, South-East Asia, and the Middle East region. The strength of this website is that it can supply a variety of in-game currency which is usually much cheaper, safer and faster-delivered than others. MMOAH.com has tons of reviews from real players that demonstrate their ultra-trust and infinite support on it. And currently, the website is scored at 9.6/10 in Trustpilot, outdistancing most of its peers.
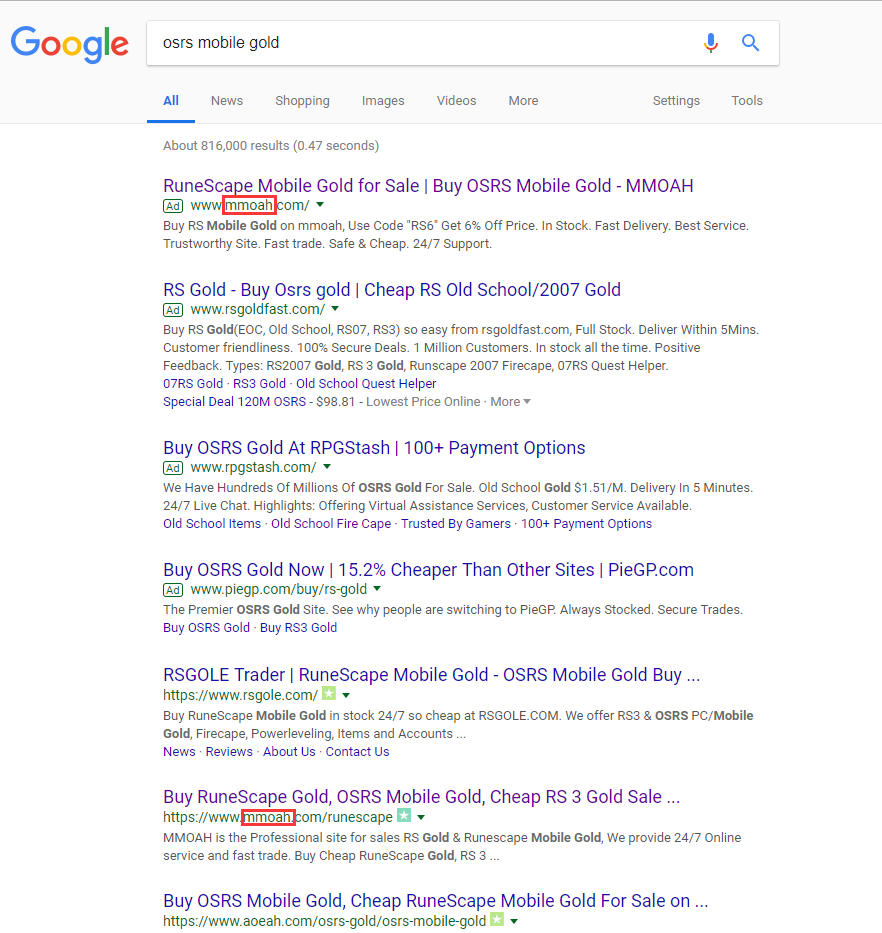
MMOAH is absolutely one of the best MapleStory 2 Mesos dealers, ranking No. 1 by searching "osrs mobile gold" in Google and that many more popular games' keywords in MMOAH rank top 3 by searching them in Google. For example DMO gold ranks No. 1, NFL Overdrive coin ranks No. 1, MapleStory 2 Mesos ranks No. 2, FH4 Credits for sale ranks No. 3, MUT 19 coins ranks No. 3, POE goods ranks No. 3, and so on.
As we all know, Google has its rigorous detecting and punishment system which can easily recognize and locate the spam websites and shut them down immediately. So There is no doubt that a website like MMOAH with such high ranks in Google Search, is 100% safe and reliable. As you see here, MMOAH is chosen to be the trustworthy OSRS Mobile Gold seller by many players and customers, and it is the first option for more OSRS Mobile Gold buyers.
Many of our new and old customers do not know the details and procedure to buy OSRS Mobile Gold at MMOAH. Now follow our step by step to learn about how to buy the cheapest OSRS Mobile Gold easily!
1. Register in MMOAH
We found that many customers have been placing orders as tourists without signing up or singing in on our websites. Therefore they lost the great opportunity to savor the member discount. Sign up on our website to be a member is important, which is convenient when you place your orders:
Faster Checkout
As our member, your personal info is kept secure by us, and you do not have to fill in the same contact info every time when you place an order, which can ensure fast verification for your order.
Get Your Member Discount
After you have registered on our site to become a VIP, logging back in with your own account every time when you place an order could be very useful and benefited. After placing your order, it'll automatically count the money you have spent to give you the corresponding membership/VIP discount.
Below is the chart to show you how the VIP discount works:
2. The larger numbers of orders you place, the larger discount you will get.
Y'all Runescapers can get the discount if order Runescape Gold at MMOAH. We have different discounts according to the different numbers of orders for RS Gold, more Runescape Golds you buy, more discount you will get.
Here is a chart to show the total discount clearly. Moreover, you can use Coupon Code in one order.
3. Coupon Code for Large Discount
You can use coupon code at any time and choose the way that you like. Please follow our Facebook Page: www.facebook.mmoah.com to get a large discount.
4. Festivals Coupon
In order to thank you for our new and old customers continuous support, we provide different big discount codes on all important festivals, usually with a short-lasting valid duration. You can get the festivals coupon directly from our News section or social media page, even email letters. So pay attention to any official announcement from MMOAH when it comes to holidays or festivals.
For example:
You want to place an order for 100M OSRS Mobile Gold.
- At first, sign up on MMOAH to be a member(if you do not have an account on our website);
- Choose "OSRS PC/Mobile" and click "100M Gold" option, then click "buy now", there goes to the checkout page(make sure your account is really in Paperwood, not others);
- Verify your products in your shopping cart carefully(including price, quantity), then fill out the discount code section with the code you already get, after that, we move to delivery information and payment method part;

- In the Delivery Information section, all terms with red stars on it mean that the below blanks are required fields. Please fill out the required fields correctly without missing anything. Please view the notice at the bottom of this section and get yourself ready once you finish the payment and prep up for trade in the game.

- The next is payment method part, the above screenshot listed all the payment methods we support currently. Be noted that any other payment methods which are not included in the above screenshot are not applicable for MMOAH payment system for now. Please choose the payment method for your own convenience and preference;
- After that, please review your order again. Once it's okay for you, you can click the "place order now" button to proceed and finish your payment. Once your payment is received by our system. Your order is finally created and will be processed immediately;
- After your payment is finished, please go back to the MMOAH website page, click the "click here to chat" button in the right bottom of the website page, you will start a conversation with our customer service within 1 minute. After our customer service check upon all your order information, you will be informed to log back in Runescape and go to the certain place for receiving your ordered product. Please be noted that the transaction belongs to the type of Face To Face. We are only doing this when your game is online, as well as you are capable of finding our delivery guy under the character name and location our customer service sends to you previously. After you receive the product from our delivery guy, please make sure anything correct and fully-delivered. If you have any problems with this delivery and the result, please get right back to our customer service ASAP to address that. If there are no complaints about this delivery from you in 30 minutes after it's finished, we will generally regard it as a "completed transaction".

In-game Currency transaction is a common concern and issue in most MMORPGs. No matter the game is a newly-released or a long-lasting old one, in-game currency transaction exists and develops, especially in some large MMOs including MapleStory 2. Plenty of players from the game want to purchase MapleStory 2 Mesos. That is a basic requirement, but somehow Maplers are confused how to buy Cheap MapleStory 2 Mesos, as well as not being scammed among a pile of MapleStory 2 Mesos dealers. How to buy cheap MapleStory 2 Mesos and not be ripped off at the same time? Well, today MMOAH will discuss and address this issue together with all Maplers.
3. Coupon Code for Large Discount
You can use coupon code at any time and choose the way that you like. Please follow our FaceBook Page: www.facebook.mmoah.com to get large discount.
4. Festivals Coupon
In order to thank you for our new and old customers continuous support, we provide different big discount codes on all important festivals, usually with a short-lasting valid duration. You can get the festivals coupon directly from our News section or social media page, even email letters. So pay attention to any official announcement from MMOAH when it comes to holidays or festivals.
For example:
You want to place an order for 500M MapleStory 2 Mesos.
- At first, sign up on MMOAH to be a member(if you do not have an account on our website);
- Choose "Paperwood(US West)" and click "500M MS 2 Mesos" option, then click "buy now", there goes to the checkout page(make sure your account is really in Paperwood, not others);
- Verify your products in your shopping cart carefully(including price, quantity), then fill out the discount code section with the code you already get, after that, we move to delivery information and payment method part;

- In the Delivery Information section, all terms with red stars on it mean that the below blanks are required fields. Please fill out the required fields correctly without missing anything, there is a field requires to upload your listed items in Black Market. Please upload the required photos with the information identical to the above filled-out information of"Item Name" and "Registered Price". Please view the notice at the bottom of this section for any other details.

- The next is payment method part, the above screenshot listed all the payment methods we support currently. Be noted that any other payment methods which are not included in the above screenshot are not applicable for MMOAH payment system for now. Please choose the payment method for your own convenience and preference;
- After that, please review your order again. Once it's okay for you, you can click the "place order now" button to proceed and finish your payment. Once your payment is received by our system. Your order is finally created and will be processed immediately;
- Usually, your order will be finished within 30 minutes. The specific ETA is usually based on the amount of Mesos in your order and our stock status. The delivery time of your order will be subject to the final confirmation from our customer service reps. Please keep online with our customer service for your order's details. Once your order is finished, we will send you a confirmation email to let you know that.
You can see the AP or SP achievements and their progress by going to your Trophies (default Y key), going to All, clicking on Filter Rewards, unselect All Rewards, and then check either Attribute Points or Skill Points.
Leveling to 60 gives you 51 SP, with an additional 4 SP from level-related trophies. You also get 11 AP from level-related trophies.
You will get AP at certain Prestige ranks. The ranks that you will get AP are:
True Power - Reach level 50 (1 AP)
Defying Limits - Reach level 60 (10 AP total)
Positively Beastly - Defeat 100 Beast Enemies (1 AP)
A Grave Affair - Defeat 100 Undead Enemies (1 AP)
Oh the Humanity - Defeat 100 Humanoid Enemies (1 AP)
Spring Cleaning - Defeat 100 Inanimate Enemies (1 AP)
A True Marathoner - Run 5 KM (1 AP)
Float - Fly 100 Meters (1 AP)
Boing, Boing - Jump 100 Times (1 AP)
Warming Up - Complete “A True Marathoner”, “A Seal at Heart”, “Keep on Trucking”, “Float”, and “Spider-Mapler” achievements at their first tier (1 AP)
Victorian Pathfinder - Explore 100 Victoria Island maps (1 AP)
The Boro Code - Remove the thorny vines and save 10 boroboro in Cherry Blossom Hill (1 AP)
Palace Undercroft Custodian - Open a door or clear debris 10 times in Palace Undercroft Dungeon (1 AP)
Freedom Regained - Free 30 Slaves in Katramus Mine (1 AP)
Turtle Trouble - Weather the Giant Turtle’s attacks (1 AP)
Shaman Smasher - Defeat Orreos (1 AP)
Future Tech - Fix Andy’s Time Machine 1 time in the Ludible Time Hall dungeon (1 AP)
Beacon of Hope - Restore 10 gates and Revive 10 soldiers in the Cusp of Life dungeon (1 AP)
Welcome to Kerning City - Discover Kerning City (1 AP). Completed during story.
Welcome to Henesys - Discover Henesys (1 AP). Completed during story.
Welcome to Ellinia - Discover Ellinia (1 AP). Completed during story.
Welcome to Perion - Discover Perion (1 AP). Completed during story.
Hero of Henesys - Complete the quest "Elder's Request" (1 AP). Completed during story.
Time Among Friends - Play for 100 Hours (1 AP)
Shopaholic - Spend 10,000 Mesos buying items in shops (1 AP)
Living off the edge - Fall 9 meters 10 times (1 AP)
Mysterious Medicine - Cleanse poison 10 times in the Poison Cave dungeon (1 AP)
Exorcist Extraordinaire - Defeat the spirit of rage in the Testing Grounds dungeon (1 AP)
Rain of Fire - Throw bombs and missiles at approaching enemies in the Watchtower Rampart dungeon (1 AP)
Self-motivated - Reach level 50 (4 SP total)
Killer Instincts - Defeat 3000 enemies (1 SP)
Exterminator - Defeat 100 Insect enemies (1 SP)
Vigilante Justice - Beat all golden tower dungeons (1 SP)
The Journey Continues - Obtain 1,000,000,000 cumulative experience (1 SP)
Trophy Maniac - Obtain 500 Trophies (6 SP total)
Friend of the Fairfolk - Clear Cherry Blossom Forest and Toxic Garden (1 SP). Completed during story.
Arbiters of Chaos - Clear Forest of Chaos and Burning Pamokan (1 SP). Completed during story.
No Mystery Too Big - Clear Ludibrium Clock Tower, Moonlight Fortress, and Muros Studio dungeons (1 SP)


